Tiny House Concepts for a Shop/Studio

There is a new movement called tiny house living…structures under 400 square feet (often under 200) that allow people to live more with less.  A chief selling point with such a dwelling is that it is often exempt from some of the land use controls (building permits, zoning permits) that other larger dwellings require.

How does this relate to me?  I needed a workplace/storage space in Blacksburg Virginia and was willing to build a larger footprint, but a larger structure would have required a 15′ setback from the property line.  A larger setback would have caused us to have to remove some of the amazing trees in our back yard and that was off the table.  The solution?  Go small.  Blacksburg lets you build an accessory structure at a 5′ property line setback IF you are under 200 square feet and less than 12′ in height.

Here is how it played out, the following is about twenty days of work – spread over seven months of weekends.
1a
Batter boards up.
1b
Four footers dug.
2
Day 2, six footings dug and poured.
3
Day 3, posts and boards.
4a
Day 4, center beam.
4b
5
Day 5, joists and decking.
6a
Day 6, insulation and flooring.
6b
Day 6, wall framing.
7.5
Day 7.5….the big lift.
8
Day 8, sheathing and a thousand
ladder trips.
9
Day 9, roof rafters.
10b
Day 10, all rafters on and roof
sheathing up.
10a
Day 10, final sheathing trim.
10.5
Day 10.5, working on the soffit.
11
Day 11, a deck to work from.
14
Day 12, deck extended and roll-up
door installed.
15a
Days 13, 14 and 15, lots of trim, windows
and siding.
115b
Day 15, waiting for the rain to stop.
16
Day 16, paint and siding.
17
Day 17, the mad rush to install
siding.
18a
Day 18, railing.
18b
Horizontal galvanized railing.
19a
Day 19, having fun with LEDs
after putting shingles on the
roof.

19b

20
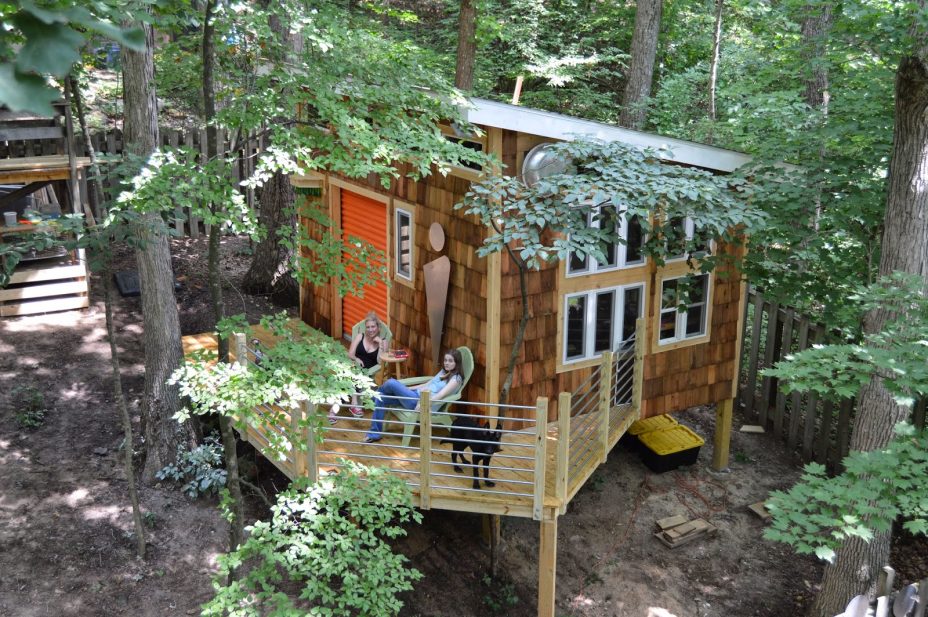
Day 20, finished!


Day 1 

Where or where should the cement go?  Having a rough idea in mind of a 196 square foot building the first step is to position the footers as squarely as possible.  Using the classic time-tested batter board method, a rectangle that was 12′ wide and 16′ long was established five feet from the property line.  The string was moved bit by bit until the diagonal measurement between the opposite corners matched.  String and a plumb were used to locate the corners and the center of the footer was established by measuring in from there.  In one day, four footers were laid out, dug and poured to a depth of 24″ (the frost line in our area).  The soil was rocky and the digging was slow.  But every hole dug was one less that had to be dug.  We were off to a start at least and that was better than talking about it for ever.


Day 2

With the end footings in place, additional footings were poured to break the 16′ span in two so that cheaper lumber could be used (8′ versus 16′ but this turned out to be a false economy as the hardware to join them cost more than simply buying 16′ lumber).

Day 3

With the perimeter footers poured, the outer support structure was established using 6×6 posts.  This structure allowed for the center footers to be laid out, dug and poured in their proper locations.  At this point we were still tweaking the design and the only thing we had determined for certain is that it will have this footprint.

We had no special tools for getting the structure level, just a line level and patience.

Day 4

Design and structure.  With the outline established, the core task was to create a load bearing method that would handle a life of service including dead loads (large power tools) and not sag.  A center beam was made by laminating lumber, supporting it with 6×6 posts on 12″ footers, then joined to the permitter beam/facia with joists.  Rain and rain made this a short work day.

Having addressed strength in the foundation, the superstructure had to be planned.  The side of the house has an atrium addition that features a very unique window arrangement, roof slope and siding.  A plan emerged that would replicate a portion of this for the shop/studio.

Day 5

As you can see in the image, the street is WAY down there, so day five was spent dragging lumber up the hill, finishing the joists and digging new footers for a small deck.  Day five started with snow and ended with rain.

Day 6

Prior to decking the floor, insulation was placed so the vapor barrier side would be up against the subfloor.  The subfloor went on well, but revealed that we were not perfectly square.  Oh well…we pressed on.

While mother nature helped, the first and largest wall was framed.

Day 7.5

A long weekend with a day and a half of work.  With massive help, the large wall was lifted and the support walls were framed to quickly go up and hold things in place.  The front wall was 11′ high and must have weight over 450 pounds once sheathed (or so it felt when I and Henry lifted it up).

Day 8

Sheathing on three walls and windows cut out with a flush trim router bit.  Working on a slope is proving to be a challenge.

We had a scare after this stage when a high wind spring storm came through our area.  I had to leave work and frantically place bracing inside the structure and hope for the best.

Day 9

A simple sloped roof with a 12 degree angle.  The fly rafters were set in with an old fashioned ladder work, let in through the first two rafters with dados.

Day 10

Spring is starting to show and the view from the roof was relaxing even though getting sheathing up from the street and then up the ladder was exhausting.  By the end of day ten, all rafters were up and the entire roof was sheathed and covered in 30 pound felt.


Day 10.5

While waiting for a 10:00 am door delivery that came at 4:00, I managed to put on a proper start to a soffit.  This turns out to be the hardest part of the project to do by yourself.  It is just impossible to hold a 12′ board in an exact position and nail it in place accurately.  A lot of time was used making a jig that could substitute for an assistant.

Day 11

The entrance to the building was proving hard to use, and it was clear that the deck had to go on prior to finishing the structure just to have a place to work.  The deck is cantilevered out a few inches beyond what is ideal, but I did not want to dig closer to the tree we were trying to avoid damaging.  The joists in the image were trimmed back considerably.

Day 12

My wife, the architect (literally), decided that the deck was “too square” and asked if I could extend it around the building a bit.  Day 12 brought a new footer, beam and deck framing to accomplish the challenge.  The dogs learned to walk on the planks and generally had a good time.  We also installed the roll-up door.

Day 14

Just grunt work.  Soffits boxed, windows framed, vapor barrier on, deck decked and bandaids applied as needed!

Day 15

Spent a good bit of time waiting inside for the rain to clear while my new pup practiced keeping his ears up.  Eventually we got a break and started putting up cedar shingles and installed the “vent fan of doom”.  The fan is designed to go on top of roof, but it was donated and had the industrial look that seemed to fit, so we put it front and center.

Day 16

Paint and finish carpentry in a tube, aka “caulk”.  Windows starting to be installed.  I have painted a great deal over the years, but I was not prepared for how exterior paint won’t wash off.  I spent a week at work looking a bit dusted.

Day 17

A friend came over to help install shingles so we put in a mad dash 12 hour day of trim, windows and siding.  It all came to a crashing halt when he fell off the deck and landed in the lumber pile, needing 12 stitches to the forehead.

Day 18

After Henry’s accident, we accelerated the railing plans, having left them off to let ladders get placed up on the shop for painting and siding.  Day 18 was all about railings and a new method of installing them.  We took standard galvanized electrical conduit and mounted it horizontally between 4×4 posts.

The rest of the day was spent building a massive 4′ by 12′ work bench inside the shop and getting three truck loads of tools out of our storage unit.  Yes, goodbye the monthly rental!

Day 19

Day 19 was spent doing two things, one fun and one brutally not.  The first half of the day was dedicated to putting on a proper shingled roof and cleaning up the resulting mess from all the cutting and trimming of shingles.

After was time to install a fun project that had been in my mind for a few years.  The entrance light to the shop is make from repurposed Pellegrino bottles and LED’s wired to a 12 volt power supply.

Day 20, final!

In our last 8 hours of work, we finished the railing, installed the stainless steel “man” on the front and got the last of the siding up.

All in all it was seven months of work, working a day or so each weekend, but the results were worth the effort.

Author: jervin

Leave a Reply

Your email address will not be published. Required fields are marked *

This site uses Akismet to reduce spam. Learn how your comment data is processed.